Jan 31, 2012

Roller Derby Valentine's Day

If you are looking for some roller derby related Valentines, click over to REM DESIGNS DeviantArt site and order some... I was working on this entry this morning, but she got hers done first, so I copied and pasted it below. Elektra Q-Tion's blog entries about roller derby can be found by clicking HERE or via a link in my list over to the right.

Roller Derby VD

I was inspired to create some roller derby Valentines.  They are free to download at this site.  Please give me credit for them if you post them anywhere.

Couple skate


For the girls we love and hate.
For the penalty box peeps.

For your lady, refs.
Inside line blue
Inside line Red
Stinky Gear
Booty block
Cheatin' on your derby wife.

Jan 30, 2012

Night Driving II

This is the second entry I've made about driving at night (refer to Night Driving for a good start). But this one is based on a lot of driving I've done in the last few weeks on the highway and on local streets. The concepts are the same. And a key point that nearly EVERYONE has forgotten, is that driving is a PRIVILEGE, not a RIGHT. Which means, there are some basic things that every driver needs to be aware of to keep their license.

Headlight overkill on an Italian scooter.
Image via Wikipedia
My first point is about headlights. This is a follow up to another entry I made about asking people to understand when to use their headlights click [HERE]. In that entry, I ask drivers to please consider when they turn on their lights. Today I am going to ask drivers to be aware of some BASIC driving concepts about headlights.


If we are driving on hilly terrain, please don't flash me your high beams because sometimes our lights will be directly in each others' eyes simply because of where we are in relationship to each other. You flashing instantly blinds me for a few seconds, and there isn't much I can do about it, except flash you back, and blind you too. That isn't safe for either of us as we approach each other at ANY speed, let alone above 55 mph.

When driving on an interstate or highway, even if there is a grassy median between us, you going south when I'm going north, and you have high beams on, will still blind me, especially on hilly terrain or going around bends. Have you figured out why there are green posts on concrete medians when we are closer together? Yeah, your lights still blind me and make it unsafe for those around us no matter how much distance separates us if there are not hills, trees, or posts to break up your high beams.

 If you are driving in a coupe or sedan, and I am driving in a medium sized SUV (like the Toyota Highlander), do not flash me, you are riding lower than me so my lights are going to hit your eyes because YOU chose a lower body style to drive. Also applies to all of the people that lower the driver seat as low as possible or recline it back more.


LED headlights, world first on production cars...
Image via Wikipedia
Headlight technology is changing. Halogens are on the way out, while Xenon and LEDs are on the way in. If I spend money to get the best bulbs I can for my vehicle, don't assume that I am leaving my high beams on (I NEVER turn them on), it is just that my bulbs are brighter than yours. Again, flashing me will only blind me and make it temporary blind to my environments.

Flashing your headlights at me can be interpreted as "aggressive driving," and yes, you can be pulled over, ticketed, and fined for doing that in several states. I leave it to YOU to find out which ones.

Okay, enough ranting about headlights at night. How about my other two points related to turning. Even though that is a basic concept, a majority of drivers out there today never truly learned it, or they just don't care about others.

All vehicles come with 4 little lights on them (including motorcycles). 2 in the front and 2 in the back, 2 on the right, 2 on the left. They are all controlled by a little rod or button that sticks out of your steering column/handlebar, at your fingertips. The purpose is so I don't have to depend on my telepathic ability to figure out what the Hell you are going to do. How about actually USING them to let me know? Both during the day, and at especially at night.

That applies not only to when you are turning from one road onto another, it applies to most driving laws to when you are simply changing lanes on a multi lane road. Yeah, you should check your local BMV/DMV driving codes to see what is expected of you there. I've been pulled over & ticketed for failing to indicate a lane change. Why? Because I now understand how unsafe that is for those around me.


When did "drift turning" become acceptable? By this I mean when you approach an intersection, and don't make a legal 90 degree turn onto that road, but you drift across my turning lane and double yellow line (on the road you are entering) at a 45 degree angle, and give ME a dirty look because I was in the turning lane? Oh, right, it is either because you don't care or your stop light actually was RED when you were trying to skate drift through it to get to your destination 30 seconds earlier.


When did driving on a side street to make a turn at night, you, AS A DRIVER, need to be aware of what is going on around you. Just because you come to an intersection and can turn without a stop sign, you still need to use the turn signals, and be aware of what people and dogs may be walking in that area. Remember, pedestrians have the right of way, the driver does not. Using the turn signals indicates to the non-telepathic pedestrians that you intend to turn (so maybe they'll stop their steps to avoid being hit) AND you need to be aware of the fact that there may be pedestrians in your neighborhood that you really don't want to be held responsible for hitting. Because yes, it WOULD be your fault. This happened recently to some friends of mine and their 2 dogs. If the driver had hit them, I would have hunted them down and made them remember each and every moment of the suffering the caused, simply because they didn't use their turn signals and didn't pay attention to what was going on around them as a driver.

Okay, maybe that is enough of a rant. A better summary of this entry is that we are all facing a lot more distracted driving today. Please go back to the BASICS that we were all taught in driving classes about headlights, turning signals, turning, and awareness to make things safer again...oh yeah, and learn what the LAWS of driving actually are in your area...

Cooking Oils

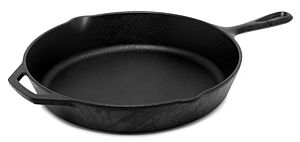
English: A cast-iron pan.
Image via Wikipedia
If you follow this blog, you will notice that I have made several entries about cooking and recipes (click to view them). But, it was to my dismay a few months ago, when my 2 decade old large cast iron skillet cracked and I had to get rid of it. I went out and replaced it with another one, and have begun again to properly season it. I had the first one just about "PERFECT" because my grandma taught me how to season cast iron skillets.

This entry is about doing some research about the oils used to cook or to season a cast iron skillet (or Dutch oven).  My grandma always instructed me to use peanut oil to season the cast iron before using it, and to apply a light layer to it after I had used, cleaned and was bout to store it, to keep it seasoned. She instructed me to keep olive oil and vegetable oil handy for use when cooking. Because I had to start the seasoning process with my new skillet, I got to thinking about how different cooking oils actually are. I found out a LOT about them...

To start with, I've always only used peanut oil to season my cast iron, never to cook in. I use olive oil for light frying or browning meat, and I use vegetable oil for heavier frying in a skillet or a touch of it in the wok. Oh, but when I make fried or scrambled eggs, I only use Olivio spread because it is butter made out of olive oil, so it combines two of my favorite things. I have only done that, because that is what grandma told me to do. But in looking at some data about oils, I might change my perspective about what I use.

A bottle of peanut oil.
Image via Wikipedia
The reason grandma always told me to use peanut oil to season my cast iron, is because as best summarized in what is shared by Wikipedia shares about Peanut Oil:
Peanut oil, also known as groundnut oil, is a mild tasting vegetable oil derived from peanuts.
Peanut oil is a common oil for frying foods, due to the high smoke point. The oil is used at Five Guys to cook their french fries.[4] Chick-Fil-A also uses peanut oil, for frying chicken.[5]
Using a mild tasting oil with a high smoke point means that "extra flavors" will not be added into what I'm cooking, but also it takes higher temps to get it to start smoking. Smoke point is the temperature that the oil reaches, before it starts to break down and emit a slight bluish smoke from your skillet or pot. And what causes that darn smoke detector to go off (how to silence that smoke detector when cooking is another blog entry). Now, back to the oil.

A chart borrowed from Wikipedia explains Smoke Point very well. I am going to restrict it to only include the oils I use. Soybean oil is predominately used to make what is labeled as "vegetable oil" (yeah, go read your label on your vegetable oil bottle).

Olive oil Virgin 391°F   199°C[6]
Peanut oil Refined 450°F   232°C[1]
Soybean oil Semirefined 350°F   177°C

So, it made a lot more sense to me what grandma was always saying, what happened in the kitchen when she used different oils. Seasoning the skillet with peanut oil means that there isn't any transfer of flavor to what you are cooking, but it is requires a higher temperature to smoke than any of the other oils you might use when cooking.

Okay, one more point that needs to be explained here, is "what temperature on the stove knob should I use when cooking with oils?" Some more research online, and some physical testing with some oil and thermometers are based on MY electric stove knobs, that have the 10 settings shown at right. Gas stoves might be slightly different. To keep in mind, is that electric stove top burners are designed to heat between 200°F and 500°F. To calculate the settings for YOUR stove, remember that there are 300 degrees between 200 and 500. Count the number of marks you have on your knob, subtract 1, and divide 300 by that number. That will tell you how many degrees exist between the steps. Start with 200 on the LOW and calculate up from there. Since I have 10 settings on my knob, I subtract 1 to get 9 steps, and divide 300 by 9. So, starting at LOW on my knob as 200°F, I step up approximately 34 degrees (but I round to 35 just to keep the math easy in my mind), the following is an indicator about what the settings are on MY stove. I did the Celsius conversions for my chart by using this formula (°F - 32) x 5/9 = °C (rounded to the nearest whole number).

LOW200°F93°C
SIMMER235°F113°C
2270°F132°C
3305°F152°C
4340°F171°C
MEDIUM375°F191°C
6410°F210°C
7445°F229°C
8480°F249°C
HIGH500°F260°C

Now, remember, they are APPROXIMATE. These are the kinds of things that you keep in your mind as mental references, they are NOT specific to your kitchen. Only YOU can figure out what your settings are by using oil in a pot, with a thermometer and writing the degrees next to your knob. Yes, you can also put your knob midway between two settings, but you'll have to figure out the approximate temp on your own (mine are approximately 17 degrees by doing that).

SO, WTF does that have to do with oil? Ummmm.... in case you didn't figure it out yet, look at the smoke point of each oil, and the setting of the knob that falls just short of making your skillet or pot smoke. While it is tempting to heat up that skillet fast, using too high of a temperature will set off your smoke alarm...trust me...I know what I am talking about, which is why I did this research. Keep the knob setting where it needs to be based on the oil that you are using, and slowly heat up the skillet for better success at cooking. If you need it fast, use an oil with a HIGHER smoke point or simply use the microwave.

I'm not going to go into the nutritional factors in comparing those oils, that may be ANOTHER blog entry (become a follower to be notified when it appears). But, as I mentioned earlier, I am reconsidering what oils I use for what. I will always use the peanut oil to season my skillets, but I might switch over to using it to cook in because of the smoke point and the nutritional factors that make it appealing. The only reason why I use vegetable/soybean oil is because it is cheaper. So, I guess it has it's own place in the kitchen, I just will buy smaller sizes of bottles of it.

Good luck...and happy skilletting...cook on...

How to Store and Travel with a Tie

9 of my 17 ties

I love wearing ties. I have over 17 in my collection now. I learned to appreciate ties by listening to my grandfather, and what he told me was to "store them on a hanger from the dry cleaner (pic at the right) and NOT on a shirt hanger or tie rack, as they will crease your tie in the middle." So, that is how I always have done it. On a hanger from the dry cleaner that has a cardboard tube, 4 per hanger to keep them balanced, and in the closet between a few pairs of pants. But times do change, so should I.

Not only do I love wearing ties, but I worked for a company where I had to travel, and always faced the conundrum of how to pack them in my suitcase without having to iron/press them when I got to my destination. I came across some info for storing and traveling with my ties. It will help me in living in an apartment with limited storage options and assist in packing my suitcase for travel. The best site I came across regarding can be found by clicking HERE. But, since this site was very limited in sharing information, I'm going to share some of my own tips to help you insure success.
Items needed

Items Needed:
  • 1 Tie
  • 1 Toilet Paper Roll (empty of the paper of course)
  • 1 quart plastic bag (sandwich or Ziploc)
  • 1 shoebox (for storing the ties, not pictured)

Recommended Procedures:
  • Use a long table or counter space to roll the tie
  • Start from the LARGE end of the tie, not the small (as shown)
    • Roll from the other end
    • The reduces the wrinkles in the most visible part of the tie
    • Do not fold the tie in half and roll that way, roll the entire length of the tie to reduce creases or wrinkles
  • Roll the tie tightly against the roll
  • Insert into the bag and seal it
  • Place all of your rolled ties into a shoebox for storage in an apartment (not shown)

Personal Tips:
You can fit 6-8 ties in a shoebox in the closet.
When traveling, take as few ties as possible. Pack them in your suitcase surrounded by rolled socks.
Be prepared to use an iron set to "steam" to remove the creases & wrinkles. They do age like we do...

Hmmmm.....I wonder if this will work well for my Italian silk suspenders too....

Jan 28, 2012

Cinder Blocks

I live in an apartment and have a limited budget to furnish it. Fortunately, I have several friends that are in the construction business, so I can get as many cinder blocks as I want. Besides, they are fairly inexpensive at Home Depot or Lowe's. But, I came across yet another homesteading blog, and felt that it was important to share.

While I don't want to make a complete sofa like the one shown at the right, I am going to make a single seating version on my patio for less than $15. I have the cinder blocks already, they've been stacking up in my garage. I never knew what I would possibly use them for, but this blog entry got my mind working. I'll pick up some throw pillows from a local thrift store to complete the build. The only different thing I might do is to sew a canvas cover for the cinder blocks. Yeah, another blog entry is going to be generated because of this...stay tuned...watch this space...and become a follower on the right...LOL.

And yet, the other blog entry got my mind going even more. Check it out, there are some GREAT ideas there for a raised garden bed, picnic tables, some attractive planting options, and what to do with what you have stored up.

Happy homesteading...

Coffee Thoughts

I am still "old school" about coffee, to the point that I still use a percolator to make it (refer to my Percolated Coffee entry for more info). But, I came across an Instructable entry for Coffee Cubes that struck my fancy enough to post a follow up to that entry. I mention in the other entry that I let the mug sit for about 15 mins to cool off before I drink it. I worked construction and remodeling for nearly 2 decades, so I got used to room temperature coffee. Now, when I am in a hurry for that first mug in the morning, I started adding ice cubes to the coffee to cool it off.

I don't add any milk, cream, sugar or anything to the mug before I drink it, but the Instructable entry struck me. Instead of watering down my coffee by using just frozen water, I'm going to make the ice cubes from coffee. I don't have an ice maker, I use the old fashioned ice cube trays (the plastic ones like in the pic, not the metal ones but I am considering getting them too from the thrift store). The Instructable entry explains how to use whatever you normally put into your coffee for flavor as well, and it just makes sense to do it. I'm posting the picture from that site as an example. My cubes will look like the 6 cubes on the right of the picture.

Further research indicates that I can make the ice cubes from tea as well, to cool the tea without sacrificing flavor. I'll be using one ice cube tray with coffee and one tray with Earl Grey for the tea. I'm also considering making some ice cubes from some RC cola, but I'm sure the carbonated bubbles will be gone by the time it freezes, but to save the flavor, I'm going to try it. Stay tuned for another entry about that too.

Happy drinking...savor the flavor, not the temp...

Jan 27, 2012

Car Wash

I was young once... and had dreams for a career. I wanted, in the 70s, to be a truck driver, an OTR guy. But I paid attention to the drivers, and I respect them deeply for what they do for us. I yield to them when I can, and flash them when they do the same for me.

The best advice that I've gotten from them, is to park my car outside in a rainstorm. This is actually the BEST car wash that you can ever experience. You don't have to expend any elbow grease, the rain does it for you. And, because rain is organic, you don't have to "buff" it to get the polish.

I've learned a lot from the truckers...and am just passing it forward...put your car out in the rain, and reap the benefits of it all...I triple dog dare you...

Jan 26, 2012

Tat Thoughts II

Last Friday I laid on a massage table/bed, being inked with an American Goldfinch (yeah, it is another of my animal totems).

I made the first 2 and 1/2 hours without too much fuss, but Christy at Blue Flame Tattoo managed to tap into the last of my nerves in the last 30 minutes, so I was pretty vocal. But, it was all good... and I survived my tenth tat. The red tones on the body of the goldfinch are blood, and they are clearing up each time I wash with Ivory...

She is also going to redo my dragonfly tats on my calves... but that is down the road...

I posted this, only to share it. For other info, please refer to my other blog entry, Tat Thoughts...

WiFi Redo

Before
I was catching up on my RSS feeds and came across this entry (Hidden Wireless Repeater) and it got my mind going...

While it was more than I "need" since I don't use a repeater, I do have a wireless connection to the iNet, but it was "bothering" me about how I had it situated on my end table. SO, I decided to give my living room an update by combining a working radio and my wireless connection point into one. Economy of scale, so to speak.

After
I took the screws out from the back of the radio (that I got from the dumpster), and because of all of the spare room, was able to place the wireless router into the body of the radio. Because it had a wood body, the signal was not diminished at all for my MacBook or my HP Tablet (thank you JJ McHugh for that). I cut a bit of the back of the radio so the power cable and the network cable would fit for the router, but it has helped me consolidate some things together, and make my living room more "visitor friendly."

Jan 25, 2012

Desire

Science Fair Project - Jan 2012

Yes...unfortunately it is that "help your kid make the BEST science fair project ever." I survived this weekend working on the one with my son, and to attempt to make it easier for YOU, I'm sharing it. He had to "choose" what project he would attempt, and of course we went to the internet for some ideas. He made his "final choice" on Human Battery Power Science from this website. Don't scroll too much, if you want some ideas for yours, click on the link, and then go to the home page (okay, here is the HOME page of it).


The "point" of this one was listed as following (yeah, I copied and pasted it):


Purpose

To demonstrate that a human body can be used as a battery by producing an electrical current.

Additional information

Batteries are devices that store chemical energy and convert it to electrical energy. Consisting of one or more voltaic cells, batteries come in various sizes and forms and are integrated into most electronic and portable devices. 
___________________________________________________________________________________


We studied the Required Materials list, and had to figure out where to get them. We found the copper and aluminum plates at Hobby Lobby ($12 total); the  0-15VDC meter  and the pre-wired alligator clips at Radio Shack (meter was $13, clips were $7, a franchise store carries more than company stores). I had lumber/wood in the garage so it didn't "cost" anything, but if had to price it out, it would be about $4.00 total. We went to Home Depot to get the plate mounting screws (stainless steel to prevent oxidation) since I wanted the least "conductive" ones & was fresh out of them (cost $2, and I actually used a $2 bill to pay).


So, we built it according to the directions. And conducted some personal tests. Here are the results:


When conducting the experiment as is listed on the website above, it will show the results you desire.
 If you "alter" the experiment a little, you will discover some more.
I recommend the "wet hands" version because we all know that water conducts more electricity.
Don't paint or stain the wood, since those components add a "variable of conductivity" into the experiment. Bare wood doesn't, and makes it all easier for you as a parent.
Mount the panels with a 1/4" overhang on the wood to connect the clips to.
PRACTICE  the presentation several times. Your scientist-to-be needs to be comfortable with what they are showing and presenting. 
Start the presentation by clipping a 9 volt battery, to demonstrate that the meter works. When you get to the "hands-on" part, you will show that the electricity reading is less, but the audience knows that the meter works.


Bottom line, by using an analog meter (NOT digital) impacts observers more, and I learned that the human body can generate an electric charge of about .5 volt DC charge....

Jan 12, 2012

Ditto Casserole

I called it Ditto Casserole, because it was due to combining some other casserole recipes on my blog, all into one. But, I would have to say that this was the most tasty one yet. I probably "over wrote" the instructions, but it is easier than it reads...


Ingredients:
  • 1 15oz. black beans
  • 1 cup elbow macaroni pasta
  • 1 can salt-free tomato sauce
  • Old Bay Seasoning to taste
  • 2 hot dogs
  • 1 1/2 cups shredded taco mix cheese
 Directions:
  1. Simmer the beans (undrained) while you boil the water for the pasta
  2. Prepare the elbow macaroni pasta according to the package instructions
  3. While that is going on, chop up the 2 hot dogs (cut in half lengthwise twice, then chop)
  4. Preheat the toaster oven to 400 F
  5. When the pasta is done, rinse and drain
  6. Pour the tomato sauce into the 2 quart saucepan from the pasta
  7. Return the pasta to that pot, and drain/rinse the beans & return that to the pasta pan
  8. Stir well, sprinkling Old Bay (or the spice of your choice) over it while stirring
  9. Add chopped hot dogs, and stir well again, adding more spices/herbs
  10. Pour into an 8x6x2 oiled casserole dish, and bake in the toaster oven for 15 minutes
  11. Spread the cheese on top of that baked casserole & return it to the toaster oven for 10 mins
Serve with a side of vegetables, a salad, and a desert... enjoy... serves 4-6 depending on how you cut it...

Microwave Popcorn - From SCRATCH

Via Burp Rags & Bustiers
A similar-minded friend of mine shared something on Burp Rags and Bustiers (BR&B) that I had to re-share here. Of course, I did some research and learned more about popcorn than I ever thought possible. If you want to learn more about popcorn, Wikipedia-Popcorn is an awesome reference. But I digress, I am going to share the process first (to prevent you from having to scroll down too far), but then going to share some of the information I've learned in my research.

You can make "microwave" popcorn simply by having kernels and a paper lunch bag. Wow, I didn't know that. By doing it that way, you aren't subjected to all of the added chemicals of the commercial versions of "microwave popcorn" and the increased nutritional factors when using oils.

Via Burp Rags & Bustiers
On the BR&B site, she recommends a smaller amount of kernels because using too much can cause a bag explosion in your microwave. The image at the right exposes that. Further research shows that 2 to 3 Tablespoons per bag are suggested. But, you need to experience this to determine what works for you. I can't give you ALL of the answers cause I don't live with you.

Next, fold the bag top down 2 or 3 times (you need to leave some room for the popcorn to expand.

Microwave for 2:50 mins on high. You need to be aware of YOUR microwave, because the amount of time might depend on the wattage that you have. You might need to decrease or even INCREASE the time, depending on what you have. Do a "science fair project" to discover what works for you. Hope you get the blue ribbon.

When done, season with the flavor you want (chili powder, melted butter, shredded cheese, etc.), add them and shake the bag, and serve. Oh yeah, as a hippie dude, save the paper bag to fuel your next backyard fire in the fire bowl.

Now, since you were kind enough to scroll down this far, some findings and perspectives, due to my research:
White popcorn is more nutritionally beneficial to you than the yellow or "normal"
Don't add too many seasonings if you are concerned about nutrition
The FDA recommends 3 cups of popcorn per day to meet your "grain input" per day (for a 2,000 calorie input)
Don't feed popcorn to children under 4 years of age (due to choking)

Pop on...and good luck...let me know what you find out if you actually try this...

Jan 10, 2012

Signs of a Hippie

Russian Rainbow Gathering. Nezhitino, August 2005
Image via Wikipedia
There are a lot of things that come to mind about what a "hippie" actually is. I believe there is a spirit of being a hippie in all of us. How others "define" you depends on how deep you impact them. Most people only have their understanding based on what they've "heard." I'm expressing what MY experience and perspectives are.

Enhanced by ZemantaI was born a month before the first Woodstock in 1969. Which means that I was raised by  people that lived in the key defining age of being a hippie. I just want to define that I was alive when the term "hippie" became expressed. This is about opening your mind to another person's perspective.

Being a child in the early 70s impacted me so deeply that even to this day, I can't ignore the signs of what I learned then about the hippie life. The parties that my Mom had on the weekends still haunt me to this day. No, I don't dress with the clothing that was popular then, but I have had very long hair, have pierced parts, don't wear dye ties but want to be comfortable. But it is a little above and beyond that, as a "lifestyle" that we all accept in our opinions.

A "hippie" is defined as (according to Dictionary.com) as:

hip·pie


a person, especially of the late 1960s, who rejected established institutions and values and sought spontaneity, direct personal relations expressing love, and expanded consciousness, often expressed externally in the wearing of casual, folksy clothing and of beads, headbands, used garments, etc.

Times and people change, this isn't a CURRENTLY definition. Drop the part about what they wear, but they still espouse the parts about institutions, values, spontaneity, love, and consciousness.Which is where I am. I guess I'm a spiritual hippie.

How I live now, daily and spiritually, that espouses it:
I still separate the colors of the glass bottles that I take to the recycle center
I use a "Can Crusher" on all of the pop cans I collect, so I can save them to take to the scrap yard
I use a mulch blade on my mower to replenish the soil 
I compost my kitchen scraps to reduce what I put in the garbage
I use canvas bags (that I bring) at stores when I purchase things, bag the items myself to cut down on wasting trees and oil for the bags that they provide
I use CFL instead of incandescent bulbs to cut down on the energy needed to light them, saving coal
I express my spontaneity each and every chance I can. It might get me in trouble, but I express it
I am in love and am very tactile
I consciously approach everything in life by determining the outcome of my actions

Peace out...

Jan 7, 2012

DIY Ice Packs

Being a DIY kind of a hippie dude, I decided to see if there was any way to make my own ice packs. Why? Over the course of my life, I've played a lot of sports (soccer, basketball, diving team, volleyball), remain very active (camping, hunting, rock climbing, spelunking, tai chi, qi gong, roller derby ref), and have a son that plays soccer, futsal, and is taking boxing training. As you can imagine, we have used ice packs a LOT. And yes, I learned from my grandma that using a bag of frozen veggies (peas work best) but now that I don't keep any of them in my freezer, I wanted to find another way to have some on hand, yet reduce the amount of chemicals and toxins that might be in the store bought ones.

You Just Need A Few Simple Ingredients To Make Your Own Gel Packs
Image from Tipnut link
In searching the web, I came across one particular website that gave the best amount of information about making your own ice-packs with items you most likely already have. It was the Tipnut entry about Quick & Easy Homemade Ice Packs. I'm going to save you a little surfing time by putting the key suggestions here and offer some other tips I've discovered on other sites.


Reusable gel type:
Method #1
2 cups water
1/3 cup vodka (80 proof)
Food coloring (any color you like)
Ziploc Freezer Bag
  • Pour liquids into Ziploc freezer bag, add food coloring (you’ll know at a glance that it’s your ice pack and not something to consume) then freeze.
Method #2
1 cup rubbing alcohol
2 cups water
Ziploc Freezer Bag (1 quart size)
  • Pour liquids into freezer bag, remove air and seal bag. Place bag seal side down into another Ziploc freezer bag, remove air and seal that bag. Place in freezer and use (and reuse) as needed (nice and slushy!).
Method #3
Liquid Dish Detergent
Ziploc Freezer Bag
  • Squirt liquid dish detergent in a Ziploc bag until the bag is about 3/4 full, seal and then freeze.
Okay, now some tips that I've come across in all of the comments on the pages and in my research.
Before using any ice pack or bag of frozen veggies, wrap it in a towel. The intensity of the coldness can
    damage the skin or nerves near the surface of the skin (depending on where you are putting it)
Putting the filled Ziploc bag into a second one (turned seal side down) helps insure less "leaking"
When filling the bags, use the amounts suggested because as liquids freeze, it expands a little.
  Do not use a homemade ice pack in a lunchbox for kids in school. They aren't allowed to have alcohol there
  Pets need these sometimes too


Anyway...keep active...but be prepared to to handle the boo-boos. I'm trying Method #3 but am using a "snack size" Ziploc and laundry detergent, because sometimes I only need a little one...

WYSIWYG & HTML

Computers and the internet have certainly changed in the last few decades. I reference my experiences with computers on my entry of Computers, but in trying to get my DIY Colored Fireplace Pinecone entry done, it brought something to my attention about blogging.

A picture of a non-WYSIWYG-editor. (it's HTML)
Image via Wikipedia
Writing a blog entry is a lot easier now than it was in the past, due to the "interface" that you use to compose it. Most blog servers have been kind enough to develop their sites so we can use WYSIWYG interaction to give life to the thoughts and feelings that we have, and I thank them for that. But, occasionally I want to make my entry look a certain way, and there aren't easy ways to use a button or simple "right click" to make that happen. Fortunately, they let a writer use an HTML editing way to make it happen, kind of like a DIY tab.

What prompted this blog entry is that I wanted to put a table on the pinecone entry as a better way to share information in a concise way, but my interface didn't have an "insert table" button to make it happen. I had to switch from the WYSIWYG tab over to the HTML tab, and manually code the information to make it happen using a combination of the '< table >' codes. While my first emotional inclination was to swear ferociously at the blog host for NOT having that option, it struck me that I should be happy that I've still stayed in touch with things to know "how" to make something happen that I desire, and then be able to achieve it.

Fortunately I paid attention to life in the late 70s to get involved with computers. And was inspired to be a writer, later in my life during the 80s. I knew the internet would be a way to touch the world as it evolved. I composed my first website in the late 80s by coding HTML in Windows 1.0 Notepad by typing HTML code and uploading it via a Prodigy account and the telephone. Now, I can use a wireless account on my MacBook INSTANTLY. Progress is a good thing. But knowing the base foundation back story helps.

Bottom line, I recommend that people learn a little HTML code to help them achieve their goals.
Enhanced by Zemanta

Jan 6, 2012

DIY Colored Fireplace Pinecones

Most people like to sit by the fire to watch the flames dance. I remember doing that when I was young, and my grandfather managed to AWE & SHOCK me when he threw in a pinecone, it burned true yellow, and then he threw in another one and it burned yellow-green!!! Being intrigued, I asked where he got them. He made them, and then he spent two days teaching me how he did it. Recently I thought about it, so I decided see what other suggestions were out there.

Plow & Hearth
They are for sale in stores and online. Plow & Hearth has them for $40 for a 5 lbs. bag, Amazon has them for $20 for a 2.5 lbs. bag, and a lot of craft stores have them too. But in living near a lot of county park trails, and remembering what I was taught, I sought more information about making them myself, to not spend so much money. By walking Dozer in the woods and taking a bag with me, I collect as many pinecones as I can carry for free. I just need to have the right things in the pantry to add the color.

While I remembered that my grandfather used table salt for the yellow and Borax for the yellow green, a little more research shared some other household things that will create more colors. The best site I found (About.com/Chemistry) had a great table. I edited it a little to only include things you can get at a local store, which I summarized from Make-Stuff.com.

Color ChemicalWhere Found
Red Strontium Chloride or 
Strontium Nitrate
Found with aquarium supplies in pet stores
Orange Calcium Chloride Rock salt, to melt ice on roads & driveways.
Yellow Sodium ChlorideTable salt
Yellowish Green BoraxLook in laundry detergent section.
Green Copper SulfateLook for it in swimming pool supplies
Purple Potassium Chloride Is a salt substitute & found in the spice section
White Magnesium Sulfate Epsom Salts

Now your question is "what do I have to DO to make them?" Like all of the other recipes that I've posted, I will give you the ingredients, instructions, and tips. I found the best site to share with you, Birds & Blooms. I copied & pasted their info below, but check out their site too.
Prep Your Pinecones: (If you use plain pinecones purchased at a craft store, skip this step.) If you’ve gathered pinecones from the great outdoors, bake them in a 200 F oven for 1 hour to remove bugs and open up closed cones. Line a cookie sheet with aluminum foil first, as sap will drain from the cones. Allow them to cool.
Materials:
  • Large bucket
  • Tongs or slotted spoon
  • Flame colorant – choose one of the following from above, depending on the color flame you prefer
The Process:
  • Pour 1/2 gallon of hot water into the bucket.
  • Add 1 cup of the colorant of your choice, and stir until dissolved.
  • Add pinecones to the mix. Be sure to add only as many as can be completely covered by the solution. Soak for 8 hours or overnight.
  • Remove the pinecones and set on newspapers to dry completely – at least 3 days.
It enthralls the kids, and gives you romantic people something to watch, but I do have some tips.

      Do NOT use in a gas fueled fireplace, especially an enclosed one
      ✔ Do NOT use on a fire or BBQ where you will be cooking
      ✔ Do NOT keep the chemicals in touch with the kids
      Burn only one color at one time, mixing the chemistry changes
           things dramatically

But, when kicking back in front of the fireplace, fire bowl, or even campfire, it can help enhance the experience that everyone can enjoy...burn on...

Jan 4, 2012

Computers

Computers have come a LONG way in the last 40 years. I started playing with computers back in the late 70s. My first experiences were on a Radio Shack TRS-80 Model III/IV. That was when we had to use 5.25" floppy disks (and yes, they actually WERE floppy). I learned how to draw the flowchart of the programs I wrote and how to use an hole-punch to use both sides of the disks. I still have my disk carrying case with the old disks in them. Hmm... I wonder if they still work...

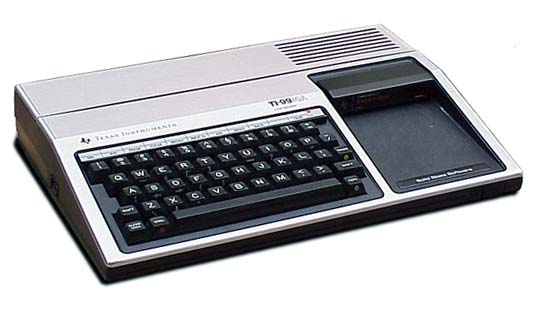
I was working as an apprentice to a master carpenter and saved my money to buy my first personal computer. I got a TI 99/4A even though a lot of my friends were going with the Commodore 64. I remember that I had to also purchase a small 13" black and white TV to use as a monitor and used an old Sears & Roebuck cassette tape recorder to store my data on. I actually think I still have that tucked away somewhere and all of the cassettes too. But, I don't have the TI99/4A anymore. It was chucked into the dumpster when I had to move, and didn't feel like carting it with me.

I went to college and actually minored in "computer technology" for a while. So, I lived through the 8086, 8088 and 80286 generations. And all of the chip mutations in between. I coded in PASCAL, COBOL, BASIC, and on the UNIX system. I drank a LOT of coffee back in those days. I relished when a meal consisted of a set of Pop-Tarts and a Jolt with a set of Vivarin in it. I miss Jolt...

Anyway... I spent nearly 20 years with a corporation working on an a PC system, and stuck in Windows. I still have the Windows 3.11 installation disks and several versions of DOS. I've suffered through all of the permutations that they've had, threw my last Toshiba against the wall and stomped on it in the driveway, and got a Mac. I'll never go back to PC.

I got to experience the Apple, the Apple II, the Apple IIc, and the Apple IIe... But they weren't "approved" at the company I was with. I currently own and use an Apple MacBook Pro, and will NEVER go back to PC.

Artful Decorations

I am single and live in an apartment but am no longer a teenager, so I no longer use heavy metal band posters to adorn my walls. I am also blessed in life to have a very close friend that is an art & graphic designer. Her site is REM Designs (yeah, click on it, I triple dog dare you). She has a lot of prints available, does commissions, writes her own blog, and is an awesome, amazing person... just drop her an email or message, and she'll work with you to get you what your soul and eyes desire. Her prints are available in various sizes, and she has a LOT more on her site. The most striking series is her drawing of the zodiac signs. I use her art for Cancer as my avatar icon on Facebook.

I've used the following images from her website as prints to be the inspiration, color, decorations, and art in my apartment.