Showing posts with label safety. Show all posts

Apr 11, 2012

You Are Driving Wrong - Part II - Steering Methods

In the Part I - Hand Placement of the You Are Driving Wrong series, I discussed where your hands should be placed (9 and 3, not 10 and 2) [link]. This follow up is about 3 steering methods and when to use each type. I'm going to summarize what is on the NHTSA document about Using Efficient Steering Techniques [PDF].

Push/pull Steering - Preferred method
  • Left hand is between 7 and 8 o’clock, right hand between 4 and 5 o’clock.


  • Depending on the direction of the turn, right or left hand pushes the wheel up and the opposite hand slides up, and pulls down.


  • Pulling hand moves down, the other hand returns to the its original position.

  • Reverse the process to bring the vehicle back to the desired path.
  • Hands never cross over the steering wheel, so there is less chance of an injury to the face, hands or arms from an air bag in the event of a crash.


Hand-over-Hand Steering:
  • Use when turning at low speeds with limited visibility at an intersection, when parking, or recovering from a skid.
  • Left hand grasps the wheel between 8 and 9 o’clock and right hand between 3 and 4 o’clock.

  • Depending on the direction of the turn, use the right top third of the wheel to move it to the right and use the left top third of the wheel to move it to the left.

  • One hand grasps the wheel and pushes up, the opposite hand lets go, reaches across the other arm, grasps the wheel and pulls the wheel up, over and down.

  • As wheel is pulled up, the hand that initiated the pushing motion releases the wheel and returns to its original position.
  • Simply reverse the hand-over-hand process to bring the vehicle into your intended path. 


One Hand Steering:
  • Use one hand steering when backing or operating vehicle controls (wipers, flashers, lights, etc).
  • The placement of one hand on the steering wheel is critical to vehicle balance, steering reversals, and potential injury.
  • When reaching for an operating control,  keep the other hand in the normal position of 8-9 o’clock or 3-4 o’clock, depending on steering wheel design.
  • One hand at 12 o’clock is only recommended when backing up and the driver turns in the seat in order to see to the rear.
  • The way the wheel is turned when backing is the direction the vehicle will move to the rear. 

Apr 9, 2012

You Are Driving Wrong - Part I - Hand Placement

I'm not a golfer, but after spending so much time with my grandfather as his caddy and what he taught me about driving, I would be remiss to not share "how times change." Under his tutelage, I learned what a driver was to a golfer, but also what a driver (of a vehicle) was as a person. As I prepare to become a mentor to a driver in a few years, I decided to do some "research" about tutoring them. I discovered that I have a lot to teach, but that I'm also doing it wrong myself. I'll cover the point of my entry first, and then add my personal comments.

"Back in the day," I was taught to put my hands at 10 and 2. Meaning, one hand at 10 o'clock and the other at 2 o'clock. It worked with the steering wheel in front of me that would get me home safely every night. But guess what....times changes. Why? Mainly because steering wheels have changed. Now, I need to put my hands at 9 and 3, as explained in a National Highway Traffic Safety Association (NHTSA) document [PDF]. I suggest you download the document and share it with anyone that you are mentoring behind the wheel.

Image from the MSNBC report site
Okay, your question is "why," but that is because times changes, so have steering wheels. Most steering wheels now contain air bags that deploy when you are in an accident. If it deploys and your hands are at 10 & 2, your arms will be blocking the safety of the bag and they will be forced backwards towards your head. According to a report on MSNBC, the bags inflate at a speed of 150-250 mph. And to quote the report:
Among the injuries the NHTSA reports from improper placement of the hands when an airbag deploys are amputations of fingers or entire hands, traumatic fractures and a particularly stomach-churning injury called "degloving," which — trust us — you definitely don't want to look up.
The bag can also slam your hands directly into your head, causing broken noses and concussions.
Yeah, I'm thinking I don't want to run the risk of any of that happening to my arms and hands. Being in an accident isn't always because YOU did something wrong, it could happen because SOMEONE ELSE caused it. So, in trying to look out for myself, I'm going to start moving my hands to the 9 and 3 position instead of the "old skool" 10 and 2. Not to mention that I've already had a TBI (see related links on the Misc / Brain Dump page) and do NOT want to cause a concussion.

In preparing to mentor a future driver, I've learned some things myself... In fact, Part II of this series will be about how to turn the wheel. Yeah, that's changed too.

Mar 29, 2012

Smoke Detectors

UPDATE
Another tip I received online was to use a shower cap over the smoke detector when cooking something that will smoke (like when using cast iron). Don't simply "deactivate" the alarm, you'll forget to enable it later. Simply slip a shower cap around the smoke detector, cook your meal, enjoy it, and you'll remove the cap later.
______________________________
The first couple of houses that I lived in didn't HAVE smoke detectors. It wasn't until I moved to Pittsburgh, PA in 1974 that I had ever seen them. I remember my dad dragging out the step ladder, drill, screws, screwdriver, smoke detector, and 9 volt batteries to install 2 in the house. One was outside my bedroom door and the other was in the living room (next to the kitchen). I also remember this was when my grandpa instructed ME to change the batteries in them. I'm not sure how it became MY responsibility to change them, but I am glad he did. I still change them twice per year, on the days that we change the clocks forward or back. Because of that, I still cringe on those days when I have to lug out the ladder and do that.

But, moving into a new built house in the late 90s and now living in an apartment has also taught me some things. Smoke detector technology has changed and we need to keep in touch with that if we are going to understand how they work and what they do.

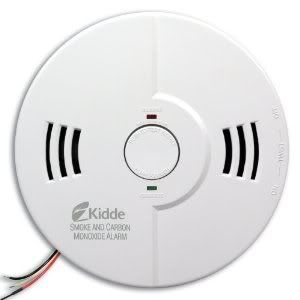
When I moved into the new built house, the contractor explained to me that the smoke detectors had advanced to the point that they not only detected smoke, but also were carbon monoxide detectors. They were "hard wired" into the electric panel now, and the battery only served a purpose if the electricity ever shut off (they would still work). But, I was diligent and changed them twice a year.

Available at Sears
And now in changing the batteries in my apartment taught me something else that has really helped me in cooking (especially in a cast iron skillet or Dutch oven). Newer smoke detectors actually have a button on them that you can press to shut them off for 7-20 minutes, should they go off for the wrong reason, like when you burn your home made home fries or hash browns. See my other blog entry about cooking oil smoking points in the kitchen for more info. And, it also vocally tells you whether it detected a fire or carbon monoxide. In the OLD days, you had to get the chair under the detector, rip the cover off, and rip the battery out. In my 90s house, you had to stand under it and fan it with a newspaper until it stopped. In my new apartment, I just have to reach up and press a button for 5 seconds (and then I have 7-20 minutes to clear the smoke out of the kitchen). WOW!!! Massively helpful things to know when I'm burning dinner.

Another new technology about the 4 smoke detectors in my apartment, is that they are all tied together by the wires in the walls. If ONE goes off, they ALL go off. So, if a fire starts down the hall in my son's room, the detector in MY room goes off. I'm more likely to hear it in my own room, than down the hall in his, with both doors closed. Yeah, that is another good development in smoke detectors.

Something else that I learned in doing some basic research, is that it is still recommended that you change your batteries twice per year, but it is also now recommended that you change your smoke detectors every 10 years. I'm fortunate that my apartment complex was only built 5 years ago, but I still listen to grandpa twice a year.

So, bottom line, some suggestions:
☑ Change your smoke detector batteries on the days that you change your clocks, so twice per year.
☑ Change your smoke detectors themselves, every 10 years to keep up on technology.
☑  Wire them all together so if one goes off, they all will go off and you are more likely to hear it.
☑ Watch what cooking oils used in the kitchen to prevent burnt dinner smoke (see the blog for more info)
Enhanced by Zemanta

Feb 22, 2012

CFL vs. Incandescent

UPDATE:
I came across an Apartment Therapy How to Buy the Right CFL cheat sheet that shares a little more info about choosing to transition from incandescent to CFLs or LED bulbs.
__________
Living in an apartment can sure change your perspective about light bulbs. The complex I live in has in the leasing contract that the "resident will replace all light bulbs with CFLs." So, being curious about them, I did some research and performed my own "field trials" with them.

There are several countries that have already enacted laws to prohibit incandescent lights and the U.S. isn't far behind them in doing it too. The best summary of what has been happening globally with CFLs and incandescent can be found at Wikipedia. And the best site to explain the differences between CFLs and incandescent can be found by clicking on Earth Friends. To keep this entry short, I won't bore you with all of the details, just share my opinion.

In trialing CFL bulbs in my apartment, I've purchased different lumen amounts because that is what sets the "shade" of the bulb. I have some that are considered soft and shed a more yellow shade of light. I also have some that are higher in lumen output, that are more white. Depending on where I use them, dictates what and how I can see things. I use the softer ones in my living room and bedroom, while using the whiter ones in the kitchen & bathroom. There is definitely a difference. It would behoove you to learn a little about lumen levels to better pick the CFL bulbs you use.

Overall, I am happy about using CFLs because they save some costs in my electric bill but learning more about them helps me choose which ones I buy and use where in my apartment. The only problem I have with them, is that you can't just throw them in the trash because they contain mercury and the complex I live in doesn't have a recycling program for them. But I'm working on that too...

Feb 10, 2012

Driving & Mirrors


I've made several entries about driving because I do a LOT of it, have been doing it for over 20 years, but love learning new things, and just want to share with you. Click the Driving Advice tab at the top to see some of my driving related entries. This one is about how to adjust your mirrors properly according to the Blindspot and Glare Elimination (BGE) settings to be able to drive more safely. Rather than re-write what has already been done, I am using the entry on the Driver's Ed Guru website as my reference. I'm summarizing that info here, but please do visit their website for more information about the BGE settings. Yeah, they even have a video you can watch...but I have it here too...

The Blindspot and Glare Elimination (BGE) mirror setting was developed in 1996 by a member of the Society of Automotive Engineers named George Platzer. The BGE setting reduces the usual two large blindspots to four mini blindzones. None of these four mini blindzones are large enough to completely hide a car.
There are several advantages to the BGE setting:
  • You no longer have to turn your head to look into the blindzones.
  • Only a brief glance at the side mirror and inside mirror is needed.
  • By glancing at the mirror, you keep the road ahead in your peripheral vision. Turning your head completely eliminates the road ahead from your field of vision.
  • Glare from the side mirrors is almost entirely eliminated. You should no longer have a trailing car’s headlights shine directly into your eyes.
This is how to set up the BGE setting:
  • Place your head against the driver’s side window and adjust the driver’s side mirror so you can barely see the driver’s side of your car.
  • Move your head as close to the center of the car as possible and adjust the passenger’s side mirror so you can barely see the passenger’s side of your car.
  • To check your BGE settings, watch as a car passes you in an adjacent lane. It should enter your outside mirror before it leaves the rearview (inside) mirror. Also, the car should appear in your peripheral vision before it leaves the outside mirror.
  • Remember, your inside rearview mirror is your primary mirror and it will take time to get accustomed to no longer seeing the sides of your car in the side mirrors.


As a personal note, I will ALWAYS use the shoulder look to confirm what I might see, even though their bullet point above says I don't have to. Sorry, been doing it for so long that I will still do it. But, employing this information means that I don't run the risk of sitting in a body shop any more than I need to...

Drive safe...

Feb 7, 2012

Lightning from the Wall

My "retro" charging station
I might be considered "retro," but I'm not as old as Ben Franklin flying his kite with a key attached to channel electricity into my apartment. But, with the advances in electricity demands coming out (iPods, iPads, cell phones, tablets, laptops, etc.), our energy needs are a little different now. So are the ways we have to plug them in to recharge. I did some searching for ways to channel the electricity to where it is needed, as proficiently as possible.

When I was a homeowner, I thought NOTHING of cutting out part of the wall, rewiring the outlets, and making them multi-gang outlets. Now that I live in an apartment, my landlord frowns on that. I resorted to using a plug strip next to my end table so I could plug in and charge up all of my stuff. But, in the pursuit of not only a cleaner method, but the addition of a USB charger, I came across the following, and thought I'd share it with you.

RCA Wall Plate Charger
I've always striven to follow technology because there is a little bit of a geek in me. But part of doing that has required me to follow the leading companies that move forward in development. So, the first solution I discovered for consolidating yet expanding my electricity needs was RCA coming out with the USB wall plate charger. How AWESOME is it to be able to have a three prong plug AND 2 USB charging stations right next to you?!?!

Job well done, and for only about $20.

However, since following technological advances, I've always been drawn to what Belkin has developed. It is as if they read my mind for what I'd like to see and what I want.

Since I spend a LOT of time in my car, I was looking for a way to charge my phone, my iPod, and my HP Tablet; by using the USB connection that comes with each item. I first purchased this Belkin product to make that happen (click HERE).

Belkin Wall Charger
But, as I have the time to do some research, I found that Belkin offers another option for doing that in the house. So, I will be getting one of THESE to put next to my end table and retire my retro plug strip...for also under $20...

Bottom line, there are some ways that you can streamline your charging needs but not sacrifice your USB connections on your computer or the plug space needed on the wall to make that happen...happy charging...


Jan 30, 2012

Night Driving II

This is the second entry I've made about driving at night (refer to Night Driving for a good start). But this one is based on a lot of driving I've done in the last few weeks on the highway and on local streets. The concepts are the same. And a key point that nearly EVERYONE has forgotten, is that driving is a PRIVILEGE, not a RIGHT. Which means, there are some basic things that every driver needs to be aware of to keep their license.

Headlight overkill on an Italian scooter.
Image via Wikipedia
My first point is about headlights. This is a follow up to another entry I made about asking people to understand when to use their headlights click [HERE]. In that entry, I ask drivers to please consider when they turn on their lights. Today I am going to ask drivers to be aware of some BASIC driving concepts about headlights.


✔ If we are driving on hilly terrain, please don't flash me your high beams because sometimes our lights will be directly in each others' eyes simply because of where we are in relationship to each other. You flashing instantly blinds me for a few seconds, and there isn't much I can do about it, except flash you back, and blind you too. That isn't safe for either of us as we approach each other at ANY speed, let alone above 55 mph.

✔ When driving on an interstate or highway, even if there is a grassy median between us, you going south when I'm going north, and you have high beams on, will still blind me, especially on hilly terrain or going around bends. Have you figured out why there are green posts on concrete medians when we are closer together? Yeah, your lights still blind me and make it unsafe for those around us no matter how much distance separates us if there are not hills, trees, or posts to break up your high beams.

 ✔ If you are driving in a coupe or sedan, and I am driving in a medium sized SUV (like the Toyota Highlander), do not flash me, you are riding lower than me so my lights are going to hit your eyes because YOU chose a lower body style to drive. Also applies to all of the people that lower the driver seat as low as possible or recline it back more.


LED headlights, world first on production cars...
Image via Wikipedia
✔ Headlight technology is changing. Halogens are on the way out, while Xenon and LEDs are on the way in. If I spend money to get the best bulbs I can for my vehicle, don't assume that I am leaving my high beams on (I NEVER turn them on), it is just that my bulbs are brighter than yours. Again, flashing me will only blind me and make it temporary blind to my environments.

✔ Flashing your headlights at me can be interpreted as "aggressive driving," and yes, you can be pulled over, ticketed, and fined for doing that in several states. I leave it to YOU to find out which ones.

Okay, enough ranting about headlights at night. How about my other two points related to turning. Even though that is a basic concept, a majority of drivers out there today never truly learned it, or they just don't care about others.

✔ All vehicles come with 4 little lights on them (including motorcycles). 2 in the front and 2 in the back, 2 on the right, 2 on the left. They are all controlled by a little rod or button that sticks out of your steering column/handlebar, at your fingertips. The purpose is so I don't have to depend on my telepathic ability to figure out what the Hell you are going to do. How about actually USING them to let me know? Both during the day, and at especially at night.

✔ That applies not only to when you are turning from one road onto another, it applies to most driving laws to when you are simply changing lanes on a multi lane road. Yeah, you should check your local BMV/DMV driving codes to see what is expected of you there. I've been pulled over & ticketed for failing to indicate a lane change. Why? Because I now understand how unsafe that is for those around me.


✔ When did "drift turning" become acceptable? By this I mean when you approach an intersection, and don't make a legal 90 degree turn onto that road, but you drift across my turning lane and double yellow line (on the road you are entering) at a 45 degree angle, and give ME a dirty look because I was in the turning lane? Oh, right, it is either because you don't care or your stop light actually was RED when you were trying to skate drift through it to get to your destination 30 seconds earlier.


✔ When did driving on a side street to make a turn at night, you, AS A DRIVER, need to be aware of what is going on around you. Just because you come to an intersection and can turn without a stop sign, you still need to use the turn signals, and be aware of what people and dogs may be walking in that area. Remember, pedestrians have the right of way, the driver does not. Using the turn signals indicates to the non-telepathic pedestrians that you intend to turn (so maybe they'll stop their steps to avoid being hit) AND you need to be aware of the fact that there may be pedestrians in your neighborhood that you really don't want to be held responsible for hitting. Because yes, it WOULD be your fault. This happened recently to some friends of mine and their 2 dogs. If the driver had hit them, I would have hunted them down and made them remember each and every moment of the suffering the caused, simply because they didn't use their turn signals and didn't pay attention to what was going on around them as a driver.

Okay, maybe that is enough of a rant. A better summary of this entry is that we are all facing a lot more distracted driving today. Please go back to the BASICS that we were all taught in driving classes about headlights, turning signals, turning, and awareness to make things safer again...oh yeah, and learn what the LAWS of driving actually are in your area...

Jan 7, 2012

DIY Ice Packs

Being a DIY kind of a hippie dude, I decided to see if there was any way to make my own ice packs. Why? Over the course of my life, I've played a lot of sports (soccer, basketball, diving team, volleyball), remain very active (camping, hunting, rock climbing, spelunking, tai chi, qi gong, roller derby ref), and have a son that plays soccer, futsal, and is taking boxing training. As you can imagine, we have used ice packs a LOT. And yes, I learned from my grandma that using a bag of frozen veggies (peas work best) but now that I don't keep any of them in my freezer, I wanted to find another way to have some on hand, yet reduce the amount of chemicals and toxins that might be in the store bought ones.

You Just Need A Few Simple Ingredients To Make Your Own Gel Packs
Image from Tipnut link
In searching the web, I came across one particular website that gave the best amount of information about making your own ice-packs with items you most likely already have. It was the Tipnut entry about Quick & Easy Homemade Ice Packs. I'm going to save you a little surfing time by putting the key suggestions here and offer some other tips I've discovered on other sites.


Reusable gel type:
Method #1
2 cups water
1/3 cup vodka (80 proof)
Food coloring (any color you like)
Ziploc Freezer Bag
  • Pour liquids into Ziploc freezer bag, add food coloring (you’ll know at a glance that it’s your ice pack and not something to consume) then freeze.
Method #2
1 cup rubbing alcohol
2 cups water
Ziploc Freezer Bag (1 quart size)
  • Pour liquids into freezer bag, remove air and seal bag. Place bag seal side down into another Ziploc freezer bag, remove air and seal that bag. Place in freezer and use (and reuse) as needed (nice and slushy!).
Method #3
Liquid Dish Detergent
Ziploc Freezer Bag
  • Squirt liquid dish detergent in a Ziploc bag until the bag is about 3/4 full, seal and then freeze.
Okay, now some tips that I've come across in all of the comments on the pages and in my research.
✔ Before using any ice pack or bag of frozen veggies, wrap it in a towel. The intensity of the coldness can
    damage the skin or nerves near the surface of the skin (depending on where you are putting it)
✔ Putting the filled Ziploc bag into a second one (turned seal side down) helps insure less "leaking"
✔ When filling the bags, use the amounts suggested because as liquids freeze, it expands a little.
✔  Do not use a homemade ice pack in a lunchbox for kids in school. They aren't allowed to have alcohol there
✔  Pets need these sometimes too


Anyway...keep active...but be prepared to to handle the boo-boos. I'm trying Method #3 but am using a "snack size" Ziploc and laundry detergent, because sometimes I only need a little one...

Jan 2, 2012

Winter Driving Preparedness & Safety

I was doing some research for a post about driving in the winter & general recommendations for vehicle preparedness to accompany my Night Driving and Headlights When Driving posts. I came across all of the info I was drafting on Wunderground.com. Rather than re-write it, I've linked directly to it and just copied & pasted the content here.

Winter weather driving can be a challenge for even the most experienced drivers. Use these tips to help you drive safely during the winter season.

Car Maintenance
Make sure to prepare your vehicle before the winter season begins. The following handy steps will help you ensure that your vehicle is safe to drive during winter weather.
  1. Check your brakes and tires.
    1. Check for wear and fluid levels of brakes.
    2. Make sure the tires have adequate tread - minimum tread is 1/16" for adequate traction. All-weather radials are usually adequate for most winter conditions. However, some jurisdictions require that to drive on their roads, vehicles must be equipped with chains or snow tires with studs.
  2. Check that your battery and ignition system is in top condition, and that battery terminals are clean.
  3. Check radiator coolant and sturdiness of hoses and belts.
  4. Check your anti-freeze and thermostat. Ensure that they are sufficient to avoid freezing.
  5. Check your windshield wipers and de-icing washer fluid. Keep spare window washer fluid in the trunk and make sure the washer blades are in good working condition.
  6. Check your headlights, tail and brake lights, blinkers and emergency flasher.
  7. Check your exhaust system, heater and defroster.
    1. Check for leaks and crimped pipes and repair or replace as necessary. Carbon monoxide is deadly and usually gives no warning.
    2. Ensure that your heater and defroster work properly.
  8. Check fuel and air filters. Replace and keep water out of the system by using additives and maintaining a full tank of gas.
  9. Check your oil. Refer to the vehicle's manual to see if a lighter grade oil is recommended for winter driving. Heavier oils tend to congeal at low temperatures and do not lubricate as well.
  10. Properly lubricate door locks that may be prone to freezing.

Driving Safety
  1. Before beginning your trip, check the current road conditions and weather forecast. For statewide highway information 24 hours a day checkout your state's Department of Transportation. For the best weather information all day everyday, check out wunderground.com
  2. Keep your car's windows, mirrors and lights clear of snow and ice.
  3. Always wear your seat belt.
  4. Leave a few minutes early.
  5. Start out slowly in the lowest gear recommended by your vehicle's manufacturer.
  6. When accelerating on snow or ice, take it slow to avoid slipping and sliding.
  7. Be aware of sleet and freezing rain.
  8. Be aware of potentially icy areas, such as shady spots and bridges.
  9. Brake early, brake slowly, brake correctly, and never slam on the brakes.
    1. If you have anti-lock brakes, press the pedal down firmly and hold it.
    2. If you don't have anti-lock brakes, gently pump the pedal.
    3. Either way, give yourself plenty of room to stop.
  10. Keep a safe distance of at least five seconds behind other vehicles and trucks that are plowing the road.
  11. When driving on ice and snow, do not use cruise control and avoid abrupt steering maneuvers. When merging into traffic, take it slow. Sudden movements can cause your vehicle to slide.
  12. Don't pass a snowplow or spreader unless it is absolutely necessary. Treat these as you would emergency response vehicles.
  13. Keep an emergency winter driving kit in your car.
  14. Maintain at least a half tank of gas during the winter season. This is good for emergency preparedness and it keeps the fuel line from freezing.
  15. Most importantly, drive smart!