Jan 7, 2012

DIY Ice Packs

Being a DIY kind of a hippie dude, I decided to see if there was any way to make my own ice packs. Why? Over the course of my life, I've played a lot of sports (soccer, basketball, diving team, volleyball), remain very active (camping, hunting, rock climbing, spelunking, tai chi, qi gong, roller derby ref), and have a son that plays soccer, futsal, and is taking boxing training. As you can imagine, we have used ice packs a LOT. And yes, I learned from my grandma that using a bag of frozen veggies (peas work best) but now that I don't keep any of them in my freezer, I wanted to find another way to have some on hand, yet reduce the amount of chemicals and toxins that might be in the store bought ones.

You Just Need A Few Simple Ingredients To Make Your Own Gel Packs
Image from Tipnut link
In searching the web, I came across one particular website that gave the best amount of information about making your own ice-packs with items you most likely already have. It was the Tipnut entry about Quick & Easy Homemade Ice Packs. I'm going to save you a little surfing time by putting the key suggestions here and offer some other tips I've discovered on other sites.


Reusable gel type:
Method #1
2 cups water
1/3 cup vodka (80 proof)
Food coloring (any color you like)
Ziploc Freezer Bag
  • Pour liquids into Ziploc freezer bag, add food coloring (you’ll know at a glance that it’s your ice pack and not something to consume) then freeze.
Method #2
1 cup rubbing alcohol
2 cups water
Ziploc Freezer Bag (1 quart size)
  • Pour liquids into freezer bag, remove air and seal bag. Place bag seal side down into another Ziploc freezer bag, remove air and seal that bag. Place in freezer and use (and reuse) as needed (nice and slushy!).
Method #3
Liquid Dish Detergent
Ziploc Freezer Bag
  • Squirt liquid dish detergent in a Ziploc bag until the bag is about 3/4 full, seal and then freeze.
Okay, now some tips that I've come across in all of the comments on the pages and in my research.
✔ Before using any ice pack or bag of frozen veggies, wrap it in a towel. The intensity of the coldness can
    damage the skin or nerves near the surface of the skin (depending on where you are putting it)
✔ Putting the filled Ziploc bag into a second one (turned seal side down) helps insure less "leaking"
✔ When filling the bags, use the amounts suggested because as liquids freeze, it expands a little.
✔  Do not use a homemade ice pack in a lunchbox for kids in school. They aren't allowed to have alcohol there
✔  Pets need these sometimes too


Anyway...keep active...but be prepared to to handle the boo-boos. I'm trying Method #3 but am using a "snack size" Ziploc and laundry detergent, because sometimes I only need a little one...

WYSIWYG & HTML

Computers and the internet have certainly changed in the last few decades. I reference my experiences with computers on my entry of Computers, but in trying to get my DIY Colored Fireplace Pinecone entry done, it brought something to my attention about blogging.

A picture of a non-WYSIWYG-editor. (it's HTML)
Image via Wikipedia
Writing a blog entry is a lot easier now than it was in the past, due to the "interface" that you use to compose it. Most blog servers have been kind enough to develop their sites so we can use WYSIWYG interaction to give life to the thoughts and feelings that we have, and I thank them for that. But, occasionally I want to make my entry look a certain way, and there aren't easy ways to use a button or simple "right click" to make that happen. Fortunately, they let a writer use an HTML editing way to make it happen, kind of like a DIY tab.

What prompted this blog entry is that I wanted to put a table on the pinecone entry as a better way to share information in a concise way, but my interface didn't have an "insert table" button to make it happen. I had to switch from the WYSIWYG tab over to the HTML tab, and manually code the information to make it happen using a combination of the '< table >' codes. While my first emotional inclination was to swear ferociously at the blog host for NOT having that option, it struck me that I should be happy that I've still stayed in touch with things to know "how" to make something happen that I desire, and then be able to achieve it.

Fortunately I paid attention to life in the late 70s to get involved with computers. And was inspired to be a writer, later in my life during the 80s. I knew the internet would be a way to touch the world as it evolved. I composed my first website in the late 80s by coding HTML in Windows 1.0 Notepad by typing HTML code and uploading it via a Prodigy account and the telephone. Now, I can use a wireless account on my MacBook INSTANTLY. Progress is a good thing. But knowing the base foundation back story helps.

Bottom line, I recommend that people learn a little HTML code to help them achieve their goals.
Enhanced by Zemanta

Jan 6, 2012

DIY Colored Fireplace Pinecones

Most people like to sit by the fire to watch the flames dance. I remember doing that when I was young, and my grandfather managed to AWE & SHOCK me when he threw in a pinecone, it burned true yellow, and then he threw in another one and it burned yellow-green!!! Being intrigued, I asked where he got them. He made them, and then he spent two days teaching me how he did it. Recently I thought about it, so I decided see what other suggestions were out there.

Plow & Hearth
They are for sale in stores and online. Plow & Hearth has them for $40 for a 5 lbs. bag, Amazon has them for $20 for a 2.5 lbs. bag, and a lot of craft stores have them too. But in living near a lot of county park trails, and remembering what I was taught, I sought more information about making them myself, to not spend so much money. By walking Dozer in the woods and taking a bag with me, I collect as many pinecones as I can carry for free. I just need to have the right things in the pantry to add the color.

While I remembered that my grandfather used table salt for the yellow and Borax for the yellow green, a little more research shared some other household things that will create more colors. The best site I found (About.com/Chemistry) had a great table. I edited it a little to only include things you can get at a local store, which I summarized from Make-Stuff.com.

Color ChemicalWhere Found
Red Strontium Chloride or 
Strontium Nitrate
Found with aquarium supplies in pet stores
Orange Calcium Chloride Rock salt, to melt ice on roads & driveways.
Yellow Sodium ChlorideTable salt
Yellowish Green BoraxLook in laundry detergent section.
Green Copper SulfateLook for it in swimming pool supplies
Purple Potassium Chloride Is a salt substitute & found in the spice section
White Magnesium Sulfate Epsom Salts

Now your question is "what do I have to DO to make them?" Like all of the other recipes that I've posted, I will give you the ingredients, instructions, and tips. I found the best site to share with you, Birds & Blooms. I copied & pasted their info below, but check out their site too.
Prep Your Pinecones: (If you use plain pinecones purchased at a craft store, skip this step.) If you’ve gathered pinecones from the great outdoors, bake them in a 200 F oven for 1 hour to remove bugs and open up closed cones. Line a cookie sheet with aluminum foil first, as sap will drain from the cones. Allow them to cool.
Materials:
  • Large bucket
  • Tongs or slotted spoon
  • Flame colorant – choose one of the following from above, depending on the color flame you prefer
The Process:
  • Pour 1/2 gallon of hot water into the bucket.
  • Add 1 cup of the colorant of your choice, and stir until dissolved.
  • Add pinecones to the mix. Be sure to add only as many as can be completely covered by the solution. Soak for 8 hours or overnight.
  • Remove the pinecones and set on newspapers to dry completely – at least 3 days.
It enthralls the kids, and gives you romantic people something to watch, but I do have some tips.

      ✔ Do NOT use in a gas fueled fireplace, especially an enclosed one
      ✔ Do NOT use on a fire or BBQ where you will be cooking
      ✔ Do NOT keep the chemicals in touch with the kids
      ✔ Burn only one color at one time, mixing the chemistry changes
           things dramatically

But, when kicking back in front of the fireplace, fire bowl, or even campfire, it can help enhance the experience that everyone can enjoy...burn on...

Jan 4, 2012

Computers

Computers have come a LONG way in the last 40 years. I started playing with computers back in the late 70s. My first experiences were on a Radio Shack TRS-80 Model III/IV. That was when we had to use 5.25" floppy disks (and yes, they actually WERE floppy). I learned how to draw the flowchart of the programs I wrote and how to use an hole-punch to use both sides of the disks. I still have my disk carrying case with the old disks in them. Hmm... I wonder if they still work...

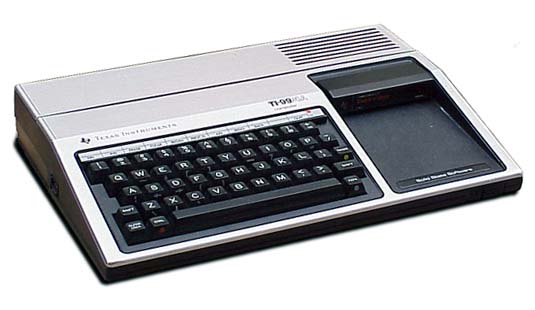
I was working as an apprentice to a master carpenter and saved my money to buy my first personal computer. I got a TI 99/4A even though a lot of my friends were going with the Commodore 64. I remember that I had to also purchase a small 13" black and white TV to use as a monitor and used an old Sears & Roebuck cassette tape recorder to store my data on. I actually think I still have that tucked away somewhere and all of the cassettes too. But, I don't have the TI99/4A anymore. It was chucked into the dumpster when I had to move, and didn't feel like carting it with me.

I went to college and actually minored in "computer technology" for a while. So, I lived through the 8086, 8088 and 80286 generations. And all of the chip mutations in between. I coded in PASCAL, COBOL, BASIC, and on the UNIX system. I drank a LOT of coffee back in those days. I relished when a meal consisted of a set of Pop-Tarts and a Jolt with a set of Vivarin in it. I miss Jolt...

Anyway... I spent nearly 20 years with a corporation working on an a PC system, and stuck in Windows. I still have the Windows 3.11 installation disks and several versions of DOS. I've suffered through all of the permutations that they've had, threw my last Toshiba against the wall and stomped on it in the driveway, and got a Mac. I'll never go back to PC.

I got to experience the Apple, the Apple II, the Apple IIc, and the Apple IIe... But they weren't "approved" at the company I was with. I currently own and use an Apple MacBook Pro, and will NEVER go back to PC.

Artful Decorations

I am single and live in an apartment but am no longer a teenager, so I no longer use heavy metal band posters to adorn my walls. I am also blessed in life to have a very close friend that is an art & graphic designer. Her site is REM Designs (yeah, click on it, I triple dog dare you). She has a lot of prints available, does commissions, writes her own blog, and is an awesome, amazing person... just drop her an email or message, and she'll work with you to get you what your soul and eyes desire. Her prints are available in various sizes, and she has a LOT more on her site. The most striking series is her drawing of the zodiac signs. I use her art for Cancer as my avatar icon on Facebook.

I've used the following images from her website as prints to be the inspiration, color, decorations, and art in my apartment.